यदि आप Windows user हैं तो आपको Windows 7, 8 व 10 के built-in Utility Tools — Disk Defragmenter तथा Disk Clean-up के बारे में अवश्य पता होना चाहिए। इन्हें use करने से PC की performance तो बेहतर होती ही है साथ-ही Hard Drive की life भी increase होती है।
 |
| Disk Defragment and Disk Clean-up |
यदि आप नहीं जानते कि Windows में Disk को defrag तथा clean-up कैसे करें, तब यह post आपके लिए अवश्य ही helpful साबित होगी।
इस post द्वारा आप ‘Disk Defragment and Disk Clean-up क्या हैं? How to use them in Windows 7, 8 and 10 to Speed-up your PC?’ के विषय में जान पाएँगें।
So, Let's get started!
इस post द्वारा आप ‘Disk Defragment and Disk Clean-up क्या हैं? How to use them in Windows 7, 8 and 10 to Speed-up your PC?’ के विषय में जान पाएँगें।
So, Let's get started!
Contents
What is Disk Defragment, Disk Clean-up in Windows 7, 8, 10 and How to use them.
- What is Fragmentation and when it occurs? 1.1. Fragmented File
- Problems caused by Fragmentation
- What is Disk Defragmentation? 3.1. Defragmenter
- What Types of Drives you shouldn't Defrag?
- Benefits of Defragmenting a Disk?
- How to Defrag a Hard Drive in Windows 7, 8 and 10
- What is Disk Clean-up?
- How to Clean-up a Disk in Windows 7, 8 and 10
Disk Defragment and Disk Clean-up : Free-up more space and improve your PC performance
What is Fragmentation and when it occurs?
हम अपने Computer से समय-समय पर बहुत-सी files or folder create, delete और modify करते रहते हैं। इससे Hard Drive में विभिन्न size के खाली blocks बन जाते हैं जो कि unused space होता है।
जब हम Computer में कोई नई file create करते हैं तो System उस file को save करने के लिए उसी size का एक खाली block खोजता है। यदि System को ऐसा खाली block मिल जाता है तो file उसमें save हो जाती है अन्यथा यह किसी बड़े block में या विभिन्न size के small blocks में pieces में store हो जाती है।
यह Fragmentation कहलाता है तथा इस स्थिति में Hard Drive को ‘Fragmented Disk’ कहा जाता है। यह एक natural प्रक्रिया है।
Fragmented File
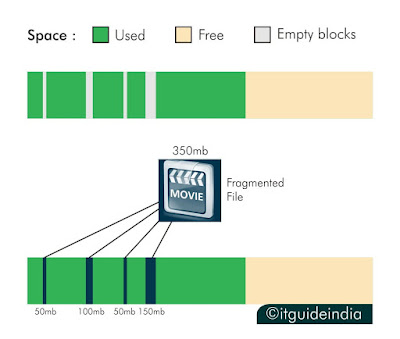
जब किसी size की एक file Hard Drive में विभिन्न locations पर कई parts में store हो जाती है तो ऐसी file को ‘Fragmented File’ कहा जाता है।For example,
मान लीजिए आप कोई 350 mb की movie download कर रहे हैं। इसे save करने के लिए 350 mb का contiguous space चाहिए, जो आपकी Hard Drive है नहीं। लेकिन 50 mb, 50mb, 100 mb, 150 mb खाली blocks available हैं। तब Computer 350 mb को इन blocks में parts में save कर देगा। ऐसी स्थिति में file को fragmented कहा जाएगा।
See the image given below...
 |
| Presentation : A fragmented file |
Problems caused by Fragmentation
आप जान हैं चुके हैं कि Disk कैसे Fragmented हो जाती है। Hard Drive के fragmented हो जाने पर Computer में निम्नलिखित problems आ सकती हैं :
- Fragmentation के कारण computer boot होने तथा Windows को load करने में ज्यादा समय लेने लगता है।
- Fragmented file को दर्शाने के लिए computer को उसके parts को कई स्थानों से उठाकर जोड़ना पड़ता है जिससे system resources पर दबाव पड़ता है तथा System slow हो जाता है।
- File को open करने, उसे modify करने, save करने तथा backup create करने में computer ज्यादा समय लेता है।
- Files पर काम करते समय Software crash और System Freeze होने की सम्भावना बढ़ जाती है।
What is Disk Defragmentation
यह Fragmentation का ठीक उल्टा होता है। इस process में HDD में unused free space को data saving लिए use किया जाता है।
इसमें Hard Drive में मौजूद खाली small size blocks को merge करके बड़े blocks बनाए जाते हैं तथा एक fragmented file के सभी parts को एक ही block में, एक ही स्थान पर store किया जाता है।
इससे computer को file को access करने तथा उसे दर्शाने में ज्यादा मेहनत नहीं करनी पड़ती और सभी programs smoothly work करते हैं।
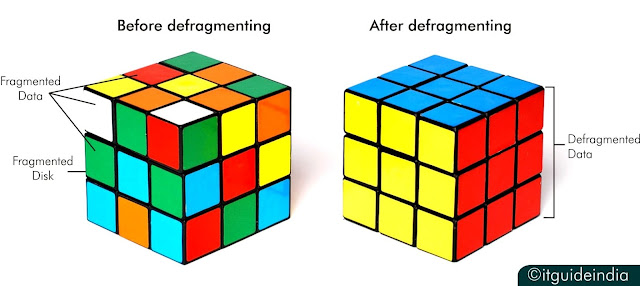
Defragmentation के process को आप नीचे दी गई image से और अच्छी तरह समझ सकते हैं :
इससे computer को file को access करने तथा उसे दर्शाने में ज्यादा मेहनत नहीं करनी पड़ती और सभी programs smoothly work करते हैं।
Defragmentation के process को आप नीचे दी गई image से और अच्छी तरह समझ सकते हैं :
 |
| Presentation : Disk Defragment |
Defragmenter
ऐसे Small Utility Tools जो Disk को defrag करने के लिए use किए जाते हैं, Defragmenter कहलाते हैं। Windows के built-in Tools – Disk Defragmenter, Microsoft Drive Optimizer ऐसे ही Tools हैं।बहुत-सी अन्य software कम्पनियों ने भी ऐसे free और paid tools बनाए हैं। Ccleaner Defraggler, Remo Drive Defrag कुछ popular tools हैं। ये आपको को internet पर मिल जाएँगे।
What Types of Drives you shouldn't Defrag?
Defragmenting केवल उन Mechanical Disk के लिए ही कारगर होती है जिनमें कोई moving parts होते हैं। HDD में एक spinning platter तथा एक read/write head होता है जो data को access करता है। Defragmenting से इसकी performance improve होती है।
यह SSD (Solid State Drive), USB Drives और SD Cards के लिए कारगर नहीं है, क्योंकि इनमें कोई moving parts तथा read/write head नहीं होता। ये drives flash memory use करती हैं।
इन storage devices को defrag करने से Computer slow हो सकता है और इनकी life भी कम हो सकती है। इसलिए इस तरह की drives को कभी भी defrag नहीं करना चाहिए।
Benefits of Defragmenting a Disk
- इससे unused free space clear होता है तथा नई files store करने के लिए ज्यादा space available होता है।
- Hard Drive को defrag करने से System को उसमें stored data को access करने में अपेक्षाकृत कम समय लगता है तथा System smoother work करता है।
- Files को create, open, modify तथा save करने में Computer को कम समय लगता है तथा हम तेजी से उस पर काम कर पाते हैं।
- Hard Drive को regularly defrag करने से वह healthy बनी रहती है तथा उसकी life increase होती है।
- Defragging से एक file के सभी parts Hard Drive में एक ही location पर आ जाते हैं। इससे Antivirus file को quickly scan करता तथा viruses को quickly detect और delete करने में सक्षम होता है।
How to Defrag a Hard Drive in Windows 7, 8 and 10
In Windows 7
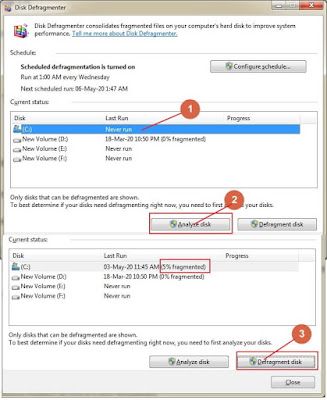
- Go to Start, search for ‘Defragmenter’ and click on it in the search results.
- अब वह drive select करके जिसे defrag करना है, Analyze disk बटन पर click कर दें। इससे System analyze करेगा कि drive को defragment की आवश्यकता है या नहीं।
- अब next window में fragment % देखें। यदि यह 10% या उससे अधिक है तब Defragment Disk बटन पर click करके Disk को defrag कर लें।
आप चाहें तो इसे Schedule भी कर सकते हैं। इसके लिए,
- Disk Defragmenter window में Configure Schedule बटन पर click करें।
- Next window में Frequency, date and time select करें।
- नीचे Select disks button पर click करके disk select करें जिसके लिए schedule on करना है। यदि सभी के लिए करना है, तब select all करें तथा OK कर दें।
In Windows 8 and 10
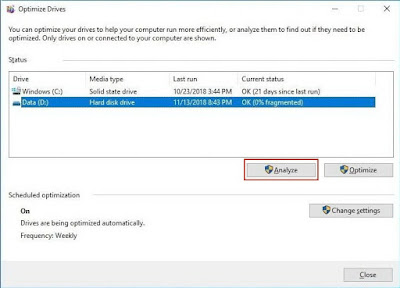
- Taskbar में ‘optimize’ search करें तथा ‘Defragment and Optimize Drives’ open करें।
- अब next window में वह Drive select करें जिसे defrag करना है तथा Analyze button पर click कर दें।
- यहाँ आप देख सकते हैं कि drive कितने percent fragmented है। अब Optimize button पर click करके इसे defrag कर लें।
- Defragmenting process पूरा होने पर आप देख सकते हैं कि यहाँ (0% fragmented) show होगा।
NOTE : Drive को defrag करने से पहले सभी programs close कर लें ताकि process जल्दी पूरा हो सके।
आप चाहें तो इसे Schedule भी कर सकते हैं। इसके लिए,
Now, let's jump to the Next Topic...
What is Disk Clean-up?
Disk Clean-up Windows में एक built-in Tool है जिसके द्वारा Hard Drive में Stored unused files – temporary files, system files, log files आदि को delete किया जाता है ताकि Hard Drive में new files store करने के लिए ज्यादा free space available हो सके।
इससे System performance boost होती है तथा Windows का booting time कम होता है।
इससे System performance boost होती है तथा Windows का booting time कम होता है।
How to Clean-up a Disk in Windows 7, 8 and 10
In Windows 7
- Go to Start, search for ‘Disk Cleanup’ and click on it in the search results.
- Recently opened window में कोई भी drive choose करें और OK कर दें।अब Disk Cleanup Tool drive में free हो सकने वाले space को calculate करेगा तथा एक new window open होगी।
- इस window में सभी कुछ select करके OK कर दें तथा Prompt box में Delete Files button पर click कर दें। That’s it.
- अब computer की सभी drives (D, E, F etc.) के लिए यही process दोहराएँ।
In Windows 8 and 10
- Search for ‘Disk Cleanup’ and click on it in the search results.
- अब Disk Clean-up window में वह drive चुनें जिसे clean-up करना है।
- Next window में files select करें जिन्हें delete करना चाहते हैं तथा OK बटन पर click कर दें।
- अब Prompt window में Delete files पर click करके files delete कर दें।
- Unused system files को delete करने के लिए ‘Clean up system files’ पर click कर दें।
ज्यादा space free up करने के लिए आप older System Restore Points तथा Shadow Copies को भी delete कर सकते हैं (नये को छोड़कर)।
- इसके लिए More Options tab पर click करें।
- ‘System Restore and Shadow Copies’ section में Clean up button पर click करें तथा prompt box में Delete button पर click कर दें।


1 Comments
bhai acha likha hai
जवाब देंहटाएंapki post rank kar rahi hai
bhai mai aapse bat karna chahta hu
8528030345
एक टिप्पणी भेजें